
By Jeff Ludeke | PUBLISHED June eleventh, 2023
There is a frequent saying that boat stands for Bust Out One other Thousand (B.O.A.T.). Realizing that boats can turn into cash pits is without doubt one of the essential causes some hunters favor to move out to their native walk-in space or hitch a journey on a buddy’s boat as a substitute. However what if I instructed you that you could possibly construct your self a pleasant duck boat for below $5,000, and have the ability to entry your native marsh or river?
With non-public land entry changing into more and more onerous to come back by, getting your self out onto the water can vastly enhance your searching alternatives. Right here within the state of Wisconsin, all navigable water is public. Article IX of the Wisconsin Structure states that navigable waters are “frequent highways and perpetually free.” In case you can entry an space legally and hold your ft moist (or boat), you might be good to go.
I’ve constructed a number of of my very own duck boats, and even went into element lately on the UPDUCK podcast, about how I constructed my very own duck searching boat. My duck boat journey has been a terrific studying expertise on many fronts. After I purchased my first Jon boat in highschool, I had no concept what I used to be doing. I realized by making errors and evolving my design by way of a few years of duck searching. If you’re studying this weblog and are interested by constructing your first duck boat, I hope this info will assist make your journey rather less intimidating, and probably prevent a couple of {dollars}.
I purchased my first boat once I was 17 years outdated. 19 years later, I simply completed constructing my 3rd duck boat. My newest boat is a 1436 G3 flat backside boat. For Jon boats, 1436 signifies that the boat is 14 ft lengthy and 36 inches broad on the backside. I settled on a 1436 after contemplating the sorts of waters I needed to navigate, the sorts of launches in my space, and the variety of hunters/canine I needed to hunt with. There are lots of boat configurations to select from, the essential half is analyzing what areas you need to hunt, after which select a measurement that most closely fits these spots. For me, I principally hunt small rivers with boat “launches” which are normally comprised of dust paths off the aspect of a bridge or street. Due to this, preserving my boat small and light-weight was a requirement. In some conditions, I’ve to tug my boat off the trailer onto the bottom, after which drag it into the water. Doing this with something larger than a 1436 wouldn’t be possible, particularly if I am searching solo.
I purchased my boat off Fb market in summer time of 2022. I drove right down to the Land of Lincoln with money in my pocket, and picked up an outdated fishing boat that was, coincidentally, used primarily at a cabin in northern Wisconsin. The hull was in fine condition general, however wanted a contemporary coat of paint. The trailer in fine condition, however you may by no means know for positive till you begin diving into your construct.
Buy the boat and convey it house:
Supplies: – Money (Financial institution – $1200)
After I acquired the boat house, the very first thing I did was pull the hull off the trailer for a radical inspection of what I had simply purchased. Upon doing so, one of many trailer bunks snapped off and despatched the boat toppling into the yard.
Repair the bunks and set up new trailer lights:
Supplies:
Handled lumber (Ironmongery store)
Bunk carpeting (Amazon – $22)
Staples (Ironmongery store)
Trailer mild package (Amazon – $27)

After the trailer was in higher form, it was time to start out diving into the hull. I used to be lucky sufficient to discover a boat that also had manufacturing unit paint, and was solely used for fishing – us duck hunters are inclined to beat up our boats. Nevertheless, the inside of the boat was scratched up and the paint worn off. I preferred the manufacturing unit shade of the boat, and needed to re-paint the inside. After getting a loopy costly quote from G3 for spray cans, I made a decision to move to my native ironmongery shop and see what they’d. I pulled off a deal with from the boat and had it shade matched on the retailer. I made a decision to attempt an ultra-flat Behr out of doors paint. As a result of my family is at the moment run by my two younger youngsters, I opted to save lots of time and never strip the prevailing paint. I knew it wouldn’t final as lengthy, however let’s be sincere, I’ll simply throw one other coat on prime as soon as it wears off.
Paint the hull:
Supplies:
Gallon of Extremely-Flat Behr Out of doors paint (Ironmongery store – $50)
Low-cost spray gun (Amazon – $30)
Air compressor

After a couple of coats of paint, the boat was trying model new once more. It’s wonderful how a lot a contemporary coat of paint can take any outdated Jon boat and convey it again to life. As I discussed above, my boat builds have developed by way of the years, and I try to make upgrades alongside the best way. For this construct, I made a decision to check out Hydro-Turf. After speaking with mates and fellow duck hunters, the Hydro-Turf appeared like an effective way to make the boat safer, make the boat quieter, save the paint job, and general make the boat look slightly extra badass. In no way is Hydro-Turf mandatory, nevertheless it does have loads of advantages.
Set up Hydro-Turf:
Supplies:
Hydro-turf sheet (Amazon – $150)
Carpenters sq.
Utility knife

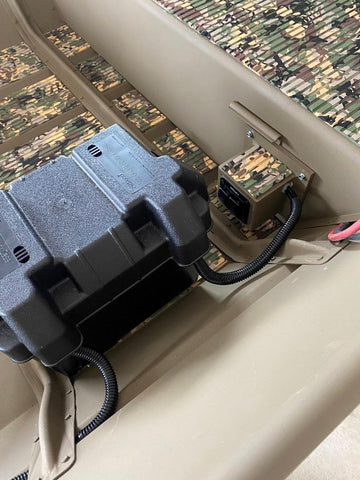
With the Hydro-Turf put in, it was time to start out electrical. Electrical is without doubt one of the most time-consuming elements of a ship construct. It is extremely essential to have a plan a head of time and know what sorts of lights, what number of lights, and the situation of stated lights. With a small boat like mine, I didn’t have a necessity for something in addition to lights and a option to begin the motor. I needed a light-weight bar up entrance, a couple of inside lights, and navigation lights. I wired all the pieces as much as a 2-gang change panel to run the inside and navigation lights separate from the sunshine bar. This was essential within the occasion you might be passing somebody at the hours of darkness. Some suggestions for electrical:
Run a bead of silicon caulk between the housing and the clear cowl in your mild bar. It will assist it keep water-tight.
Use quick-connects on your wiring to save lots of you time within the winter whenever you need to take away your entire lighting.
Analysis the wiring in your switch-panel in an effort to eradicate the everlasting mild that stays on even whenever you’re not utilizing the lights.
Set up electrical:
Supplies:
Nilight 20” lightbar w/ harness (Amazon – $40)
Nilight 2-gang change panel (Amazon – $15)
LED strip Nav lights (Amazon – $10)
LED strip inside lights (Amazon – $14)
3D printed change field for panel ($0.30)
Batteries (1 for lights, 1 for motor) – (Amazon – $120)
Battery field (Amazon – $20)
Electrical tubing (Amazon – $15)
Wires/connectors/heat-shrink tubing, and so on. (Amazon – $100)


The blind is a chunk of the mission that I went forwards and backwards with. As a result of my boat is smaller, I wasn’t positive if it was price setting up one other home-made blind. On my earlier boats, the blind didn’t perform very successfully, and typically ended up being extra of a problem than it was price. In some conditions, you’ll be able to both stand/sit in shallow water with a marsh stool or discover an space that has some surrounding public land to sit down on. Regardless of my finest efforts to cross on constructing a blind, I made a decision to place one other one collectively. Ultimately, I’m glad I did. On my final two boats, I’ve had success utilizing Bimini prime brackets and caps to assemble a primary scissor-style blind. You probably have ever been on a pontoon boat with a cover, the framework is precisely like most boat blinds. The Bimini {hardware} simply attaches to electrical conduit, swivels to both aspect of the boat, and is definitely faraway from storage or transportation. Throw on some camo, and also you’re able to go.
Construct the blind:
Supplies:
Ø3/4 electrical conduit and elbows – (Ironmongery store – $100)
Bimini prime eye finish caps (Amazon – $10)
Bimini prime deck hinges (Amazon – $16)
Golf follow internet – (Amazon – $40)
Camo techniques netting (Fleet Farm – $150)
Raffia grass – (J. Stern – $40)
Zip ties – (Ironmongery store -$10)


Now for the principle course, the motor. My earlier boat had a Swamp Runner longtail package paired with a small 212cc predator motor. This set-up was a terrific starter package, and acquired me the place I wanted to go. Nevertheless, after shopping for a 2-foot longer boat, I knew I would wish extra horsepower. Captaining a “Thai” longtail package is like steering the Titanic. Due to this, I made a decision to buy a Backwater Inc. longtail package. I headed over to my nearest Harbor Freight and picked up a brand new 459cc Predator motor. The Backwater package is all American made, and it reveals. This set-up was an enormous improve from my Thai package and pushes my 1436 at about 20MPH.
Set up the motor and longtail package:
Supplies:
Backwater longtail package – (Backwater inc. -$1400)
Predator 459 motor – (Harbor Freight – $450)

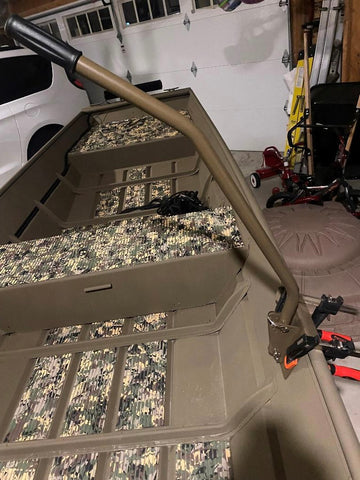
Putting in a seize bar was a minor improve to the boat, however one which required me to get artistic. My earlier boat had a grab-bar comprised {of electrical} conduit that was mounted behind the center seat. My new boat is longer and didn’t enable me to swap it over. I made a decision I needed a seize bar that swiveled down and out of the best way for storage, so I bought a seize bar instantly from Backwater Inc. After I mocked up the mounting bracket on the aspect of the boat, I rapidly realized that the edges didn’t have sufficient rigidity to help my weight hanging on the deal with. I used to be decided to make the seize bar work, so I discovered a couple of items of aluminum angle iron, tied it into the ribs on the sidewall, after which celebrated with a beer. The construct was full!
Seize Bar:
Supplies:
Seize bar – (Backwater inc. – $175 )
Angle iron (present in storage)

Time to hunt:
Supplies:
Duck boat rig: – (Whole: $4,500)

General, I’m more than happy with how this construct turned out. I used to be ready to make use of the boat fairly a couple of occasions this half waterfowl season, and by no means had any main points (other than sand consuming my prop). In case you resolve to go down the duck boat construct street, I hope you’ve got realized a factor or two from my construct.
Cheers!
Jeff


![[ATA Show 2026] Black Gold Premium Accessories: Quivers, Rests, Sights](https://i0.wp.com/www.alloutdoor.com/wp-content/uploads/2026/01/20260107_152944-e1768182177238.jpg?w=350&resize=350,250&ssl=1 "[ATA Show 2026] Black Gold Premium Accessories: Quivers, Rests, Sights")
 FOR 2026")
![[ATA Show 2026] NEW Bear Archery Compound Hunting Bows for 2026](https://i1.wp.com/www.alloutdoor.com/wp-content/uploads/2026/01/20260107_151321-e1768164075233.jpg?w=350&resize=350,250&ssl=1 "[ATA Show 2026] NEW Bear Archery Compound Hunting Bows for 2026")
")


